Workspace Setup
A workspace is where your team collaborates with AI. This guide walks you through creating a workspace, inviting members, and configuring the essentials.
Prerequisites
- You have a CubePlex account (see Quick Start).
- You have org admin or owner permissions to create workspaces. Workspace members can skip to Join an existing workspace.
Create a workspace
- Open the workspace switcher at the top of the sidebar and click New workspace (this opens the Workspaces page).
- Fill in the Create workspace form with a name and confirm.
You are automatically assigned the workspace admin role in the new workspace.
Invite members
There are two kinds of invite links, depending on what you want the newcomer to join:
- Workspace invite — the newcomer joins a specific workspace at the chosen role. Use this when someone should land directly in one workspace.
- Organization invite — the newcomer joins your organization (as Admin or Member) but is not yet placed in a workspace. After accepting, they run a short onboarding step to create their first personal workspace. Create organization invites from the org admin Members area.
To invite to a workspace:
- Navigate to your workspace, open Settings in the sidebar, then select the Members tab.
- Click Invite member.
- Enter the user's email address and choose a role:
- Admin — can manage workspace settings, tools, skills, and members.
- Member — can chat, use tools, and install personal skills.
- The invited user receives an email with a link to accept.
Join an existing workspace
- Self-hosted
- Cloud
Click the invite link, or ask your admin to add you directly from the workspace members page. Depending on your instance's registration policy, you may need admin approval.
CubePlex Cloud is coming soon. Until it is available, join a self-hosted instance (see Self-hosted).
Configure models
Before your team can chat, at least one AI model must be enabled at the organization level.
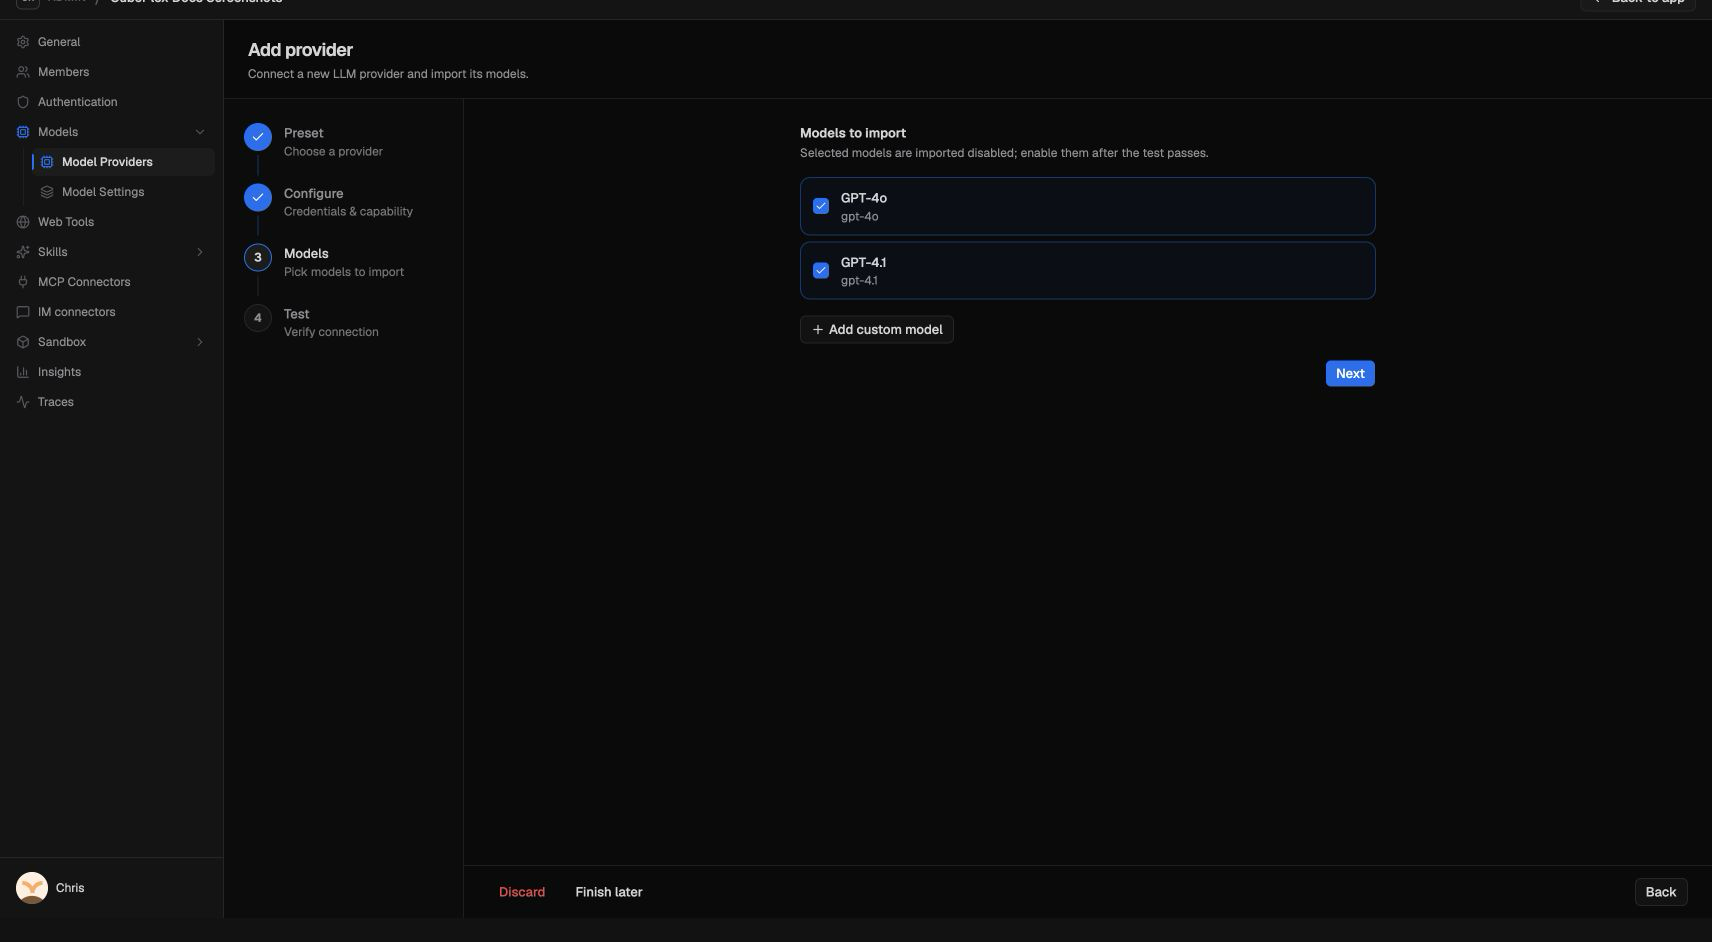
- Open the Admin area from the avatar menu (Admin panel), then go to Models > Model Providers.
- Add a provider (Anthropic, OpenAI, or a custom endpoint) and enter your API key.
- Enable the specific models you want available.
Models enabled at the org level are available across all workspaces.
Install MCP tools
MCP connectors let the agent interact with external services.
- Open the MCP page from the workspace sidebar.
- Browse the connector catalog and click Install on the one you want.
- Provide authentication credentials (a static credential, OAuth, or none, depending on the connector).
- Choose which workspace members should have access via Grants.
Once enabled and credentialed, the tools are available to the agent in conversations. See the MCP Tools guide for a full walkthrough.
Agent Persona
Agent Persona (Settings → General) sets standing instructions for the AI assistant in every conversation in this workspace — role, tone, and policies that should always apply.
You can edit the persona text on the settings page, or ask the agent in chat to update it (for example: “From now on always answer in formal Chinese in this workspace”). Changes apply on subsequent turns and affect all workspace members. Prefer Memory for small personal preferences; use persona when you want a durable workspace-wide role or policy block.
Install skills
Skills extend what the agent can do. To add skills to your workspace:
- Open the Skills page from the workspace sidebar, or use the
/command inside a conversation to discover skills. - Browse built-in skills, org-uploaded skills, or remote registries.
- Click Install to make a skill available in the workspace.
See the Skills guide for details.
Set up automation (optional)
If you want the agent to run tasks on a schedule or in response to events:
- Open the Scheduled Tasks page (for cron, interval, or one-shot runs) or the Triggers page (for webhook URLs that start an agent run) from the workspace sidebar.
- Create a scheduled task or an event trigger.
- Configure the prompt, model, and any tools the automated run should use.
See the Automation guides for details.
Archive or delete a workspace
Workspace admins can archive or permanently delete a workspace from Settings > Danger Zone. Permanent deletion first blocks new execution and asks active responses and background tasks to stop. If process or log cleanup is still running, the workspace and its cleanup records are retained and the UI asks you to retry. A later retry completes deletion after cleanup is confirmed.
Next steps
Your workspace is ready. Here is where to go from here:
- Conversations — Start chatting with full context on features.
- Memory — Set up shared memory so the agent remembers team knowledge.
- Members & roles — Manage organization-wide membership.
- Cost tracking — Monitor token usage and cost across your organization (Admin > Insights).